


Tripwire is a part of IVS (Intelligent Video Surveillance). Using advanced video analytics, this function can enable the security camera may intelligently recognise events caught by the camera’s video recorder. It’s a better approach to keep an eye on and protect an area of interest than relying just on motion sensors… Instead, if your camera supports it, utilise the Tripwire function.
This guide will show you how to enable the Tripwire function on your TSE security camera system. Tripwire is a smart feature that uses video analytics to detect movement across a specific line you draw in the camera view. It's more effective than just relying on motion sensors because it can ignore things like light changes.
Step 1: Go to the Main Menu and select AI.

Step 2: Among some sub-options, for this purpose of this guide, select the Parameters on the left-hand side, it will drop down to other options. Now all you need to do is to choose Smart Plan to proceed.

Step 3: You will see the Channel representing the cameras you have at the top position, use the drop-down box to select the right camera (right channel) you want to have Tripwire. Then click Apply.

*Note: The bulb icon will be highlighted when the channel is selected.

Step 4: Next, you now need to select IVS that is located under the previous smart plan option.

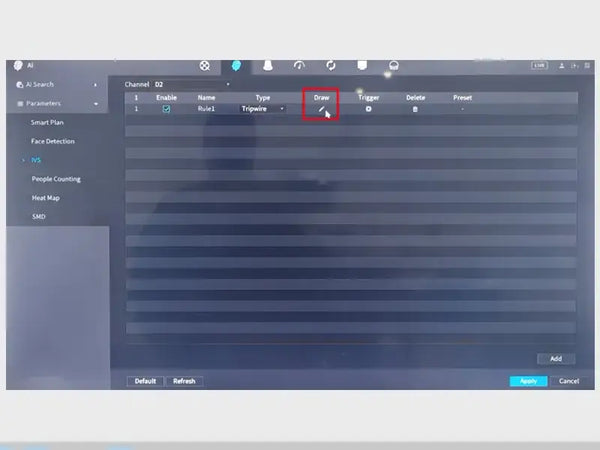
Step 5: Now you can use the drop-down box to select the Channel (just like step 3), and then click Add in the lower right side of the screen to Add an IVS rule

Step 6: Now you will see the created rule appearing in the list.

Step 7: Then, you click the Pencil icon to draw the Tripwire rule as your wish.
Step 8: This is an important step. Now you will see the full screen of the camera showing the view you need to target, with the name and the direction at the top left corner.
*Note: there are a few things you should know:
-
Name: A name can be applied to the rule
-
Direction: Both, A To B, B To A, which means what way you will draw the line.
-
The icon represents the Target Filter function.
-
The icon allows you to clear completely current rule.

Next, start left-click anywhere inside the video frame to begin drawing the trip line. You will need to use the mouse to draw the trip line.
*Note: Left click to draw, right-click to stop. So, if you want to draw more than 1 line, keep the left click where you want to change the direction.

* Watch our clip for extra detail of the different areas such as doors or how to set up and adjust the size of the target filter, etc. This is special guidance for specific demands. Our TSE technical support can walk you through step by step and advise important things.
Step 9: When you are satisfied with your rule, click OK to save it, and you will be led back to the main menu.

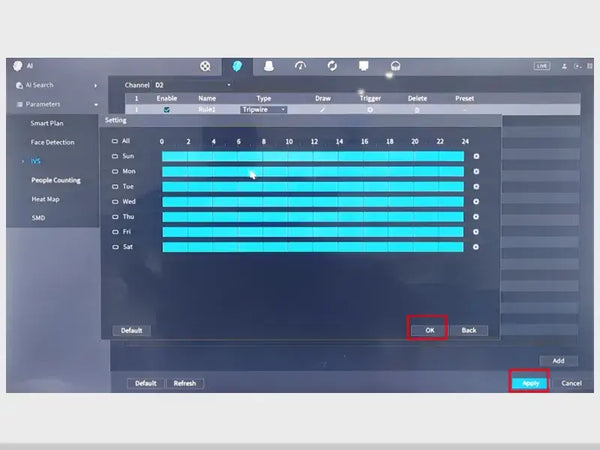
Step 10: At the main menu, click the Trigger setting to set up additional conditions for the IVS Tripwire rule that you just created. A popup window will appear immediately.

Step 11: The most popular setting that you need to do is edit the Schedule of your rule. You can also choose the way you want to receive the notification of intruders, such as email or alarm.

Step 12: Now you can edit the desired timesheet that you want the Tripwire works. It depends on the location of your cameras.
For instance, in an office area, the Tripwire should be turned on out of working hours only to not cause unnecessary annoying alarms. But for warehouses or residential houses, users may consider turning them on all the time to prevent unwanted intruders.
After completing all steps, click OK and Apply to save all settings.
Step 13: Do the final check when you go back to Live View. You will see the trip line you drew on previous steps appearing on the screen of that channel.

Step 14: You can now select Storage to edit the recording conditions.
*Note: This step is additional, which can be used when you only want to record the footage when there is intrusion happening. This selection will help you save space in case your CCTV system has limited HDD storage/cloud storage.

Step 15: Select Schedule on the left side, and Record at the top. In the Channel view, select the camera you are about to set up.
*Note: if you want to set up different conditions for the different cameras, you must do it individually for each camera.

Step 16: A smaller popup will appear on each day you want to adjust the time. You will need to make sure all periods have the Intelligent enabled (ticked), which means they are linked with the Tripwire line you drew above.
After you finish adjusting all the time you desire, click OK to save all settings. Then finally Apply to make sure all your steps are saved.

Need Help?
Our TSE technical support team can walk you through this process and answer any questions you have. They offer a clip with more details on specific situations.

