The Network Video Recorders (NVRs) offer the benefits of managing bandwidth and storage with the latest H.265+ compression technology. The all-in-one NVRs have powerful capabilities, supporting the very high resolution for recording with controller software.
Especially, the AI feature equipped with the network cameras will control captured images and determine the movements of the objects. The smart cameras/NVR look at individual picture frames and compare them to the previous ones to perform this feature. If the system identifies differences, then motion is expected to take place.
TSE's NVRs make video management easy!
These recorders use advanced technology to compress video files, saving storage space. They also work with powerful software for high-resolution recording.
On the other hand, a network recorder needs to be configured to accurately differentiate between object movements, light changes, background changes, and unidentified humans breaking into your property. You don’t have to use the entire screen for one area, and it’s possible to set the trigger area using the setup menu on the NVR. Set the trigger area remotely if the NVR is connected to your network/ internet.
TSE’s NVRs are equipped with next-generation Artificial Intelligence and Deep Learning algorithms. Smart Motion Detection, Human detection, and Number plate recognition make searching for recorded footage easier and faster with many well-known top branch technologies.
In this article, TSE qualified engineer will help explain each step to playback video and backup footage on the NVR.
Finding footage is a breeze:
This guide will show you how to playback recorded video and save clips.
Instruction:
Step 1: On the screen, right-click to go to Main Menu.

Step 2: In here, you will use your username and password to log in to the NVR. Type the username and password we created for you (or type yours if you already changed the default ones). Then click OK.

Hint: Most customers often forget the password at this step. The NVR only allows a few times. If you are failed more than its limit, you will be locked out. So, if you are unsure about the login details, please contact our service team to protect your security.
Step 3: Once in the main menu, move to the Search function in the top left area,
Left-click to choose.

Hint: Now, you are directed to the video viewing screen, where we can playback anywhere and anytime you want of the footage.
Step 4: You will need to select the targeted date you want to view the footage. Here, you are free to choose the date/month/year as your wish.

Hint: The tiny dot under the date means that the date is chosen.
Step 5: Below the calendar, you will see the camera options. Choose your targeted camera(s) to playback.

Step 6: Next, choose the features you want to see in the video.
You can select all features to have a general playback.
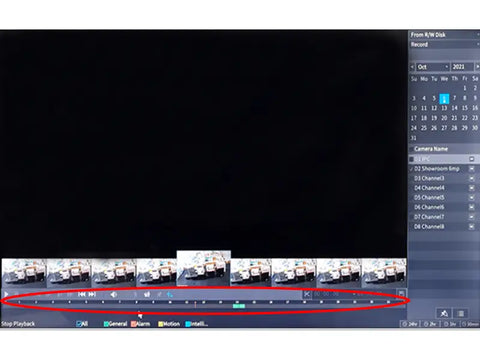
- Step 6a: Now, you see a green bar representing the footage scenes and the corresponding time frames.

- Step 6b: If you want to make sure to have the correct styles selected, there are 5 electives under the green bar:
All – General – Alarm – Motion – Intelligence


Example: The footage in the picture represents the time at 1:45 pm
H2: How to backup footage.
When you have the right footage, take a snippet of that footage scenes.
Following our step-by-step, if you want to be done by yourself.
Step 1: Make sure that you have an external USB, or hard drive plugged into the system, where you can back up the footage.

Close the prompt box on the screen with a right-click when the USB is plugged in.
Now that you have a device plugged into the recorder and you can currently save the whole footage. But if you want to have a cutting, we can now use the feature on the bottom right corner.
Step 2:
-
Move the first bar to the time of the start of your snippet and click the above scissor to maintain.
-
Move the other bar to the time of the end of your snippet and click the above scissor again to maintain.
-
Now you have 2 different times: Start time and End time.
-
When you have the desired snippet, click the Save at the right.

Step 3: to the Backup option box:
-
Select all the mini boxes,
-
Change video format to MP4,
-
Then, click Backup

Step 4: to Browse box:
-
Check the address: the file’s name.
-
Check the file location,
-
Then, click Start

Step 5: Wait for the timebar’s full loading, and you’ll get the backup file you need.

At TSE, with many years of combined product knowledge and onsite experience, our team is confident in providing the process of “Design-Program-Provide-Complete”.
TSE Technical Support Service
-
Security system technical support
-
Remote technical support
-
Security system technical service provider
-
Corporate security system technical support
TSE is here to help!
Our team of experts has extensive knowledge and can help you with all your security system needs, from design to technical support.


